Iteration 2: Core Data
Iteration 2: Core Data
Learning Goals
- Students will use Core Data to store and retrieve photos/captions
Plan
This is the most tutorial-based iteration of a project you will complete at camp. Core Data is a big framework and we don’t have time to learn it at a deep level. For this iteration, follow along the step-by-step guide.
Please don’t copy and paste code -
- it won’t allow you to think about what the code you’re typing is doing, and
- you may have different names for some important variables, and need to think carefully about that.
There are some reminders throughout, but keep in mind that copy and pasting along will not necessarily make this piece of functionality work in your app!
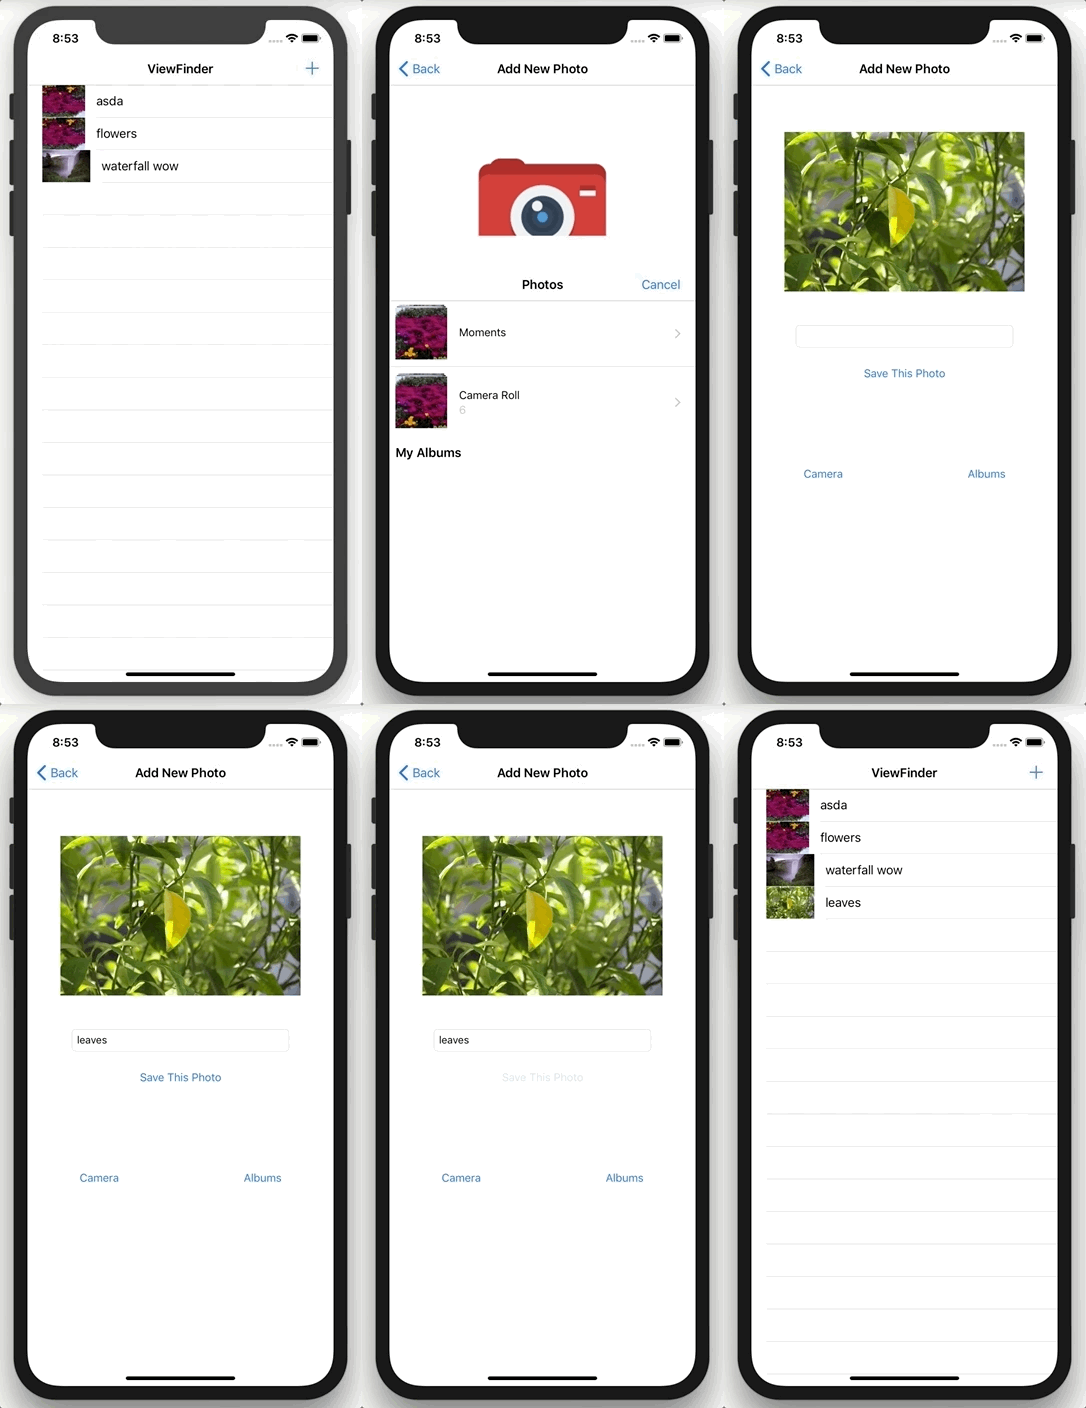
By the end of this iteration, this is the functionality you should have:

Getting Started
- Open up your ViewFinder project
- Make sure you have completed Iteration 1
Set Up Table View
Before you get start using Core Data, you’re going to need to do some setup on your Table View.
-
File ➡ New ➡ File ➡ Cocoa Touch Class ➡ Click
Next, name can be whatever you think is appropriate (PostTableViewController, PhotoTableViewController, etc.), and make sure it is a subclass ofUITableViewController. -
On the StoryBoard, select the
TableViewController. In the Utilities Pane, under the Identity Inspector tab, in theClassdropdown, select the View Controller you just created. This connects the view to the code! -
Back in your new
TableViewControllerfile, delete theoverride func numberOfSectionsfunction - we don’t need it! -
In the first
tableViewfunction withnumberOfRowsInSection, we are currently returning 0 cells; this won’t be helpful! Change the return value to 10, for now. -
Uncomment out the entire
override func tableView(_ tableView: UITableView, cellForRowAt indexPath: IndexPath) -> UITableViewCell { ... }function. -
Inside that function
tableViewthat you just uncommented, delete the line that starts withlet cell = ... -
In place of it, write
let cell = UITableViewCell(). Thiscellis referring to each row in the table. Because we stored an instance ofUITableViewCellin thecellvariable,cellnow has all these attributes on it that we can take advantage of! -
On the next line, write
cell.textLabel?.text = "anything you want in here!"Let’s break this down:cellaccesses the instance of theUITableViewCell.- Calling
.textLabelon it asked to access the label, then adding the?unwrapped it. - Lastly, we have to call
.textto actually take the text out of the textLabel attribute.
Run your simulator - do you see the text show up in on the first 10 rows?
-
We can also add a small image on each row, to give the user a preview of what picture they’ll see when they tap on a row. Let’s add this line of code below the line where you assigned your textLabel with a string:
cell.imageView?.image = UIImage(named: "name-of-image-from-assets") -
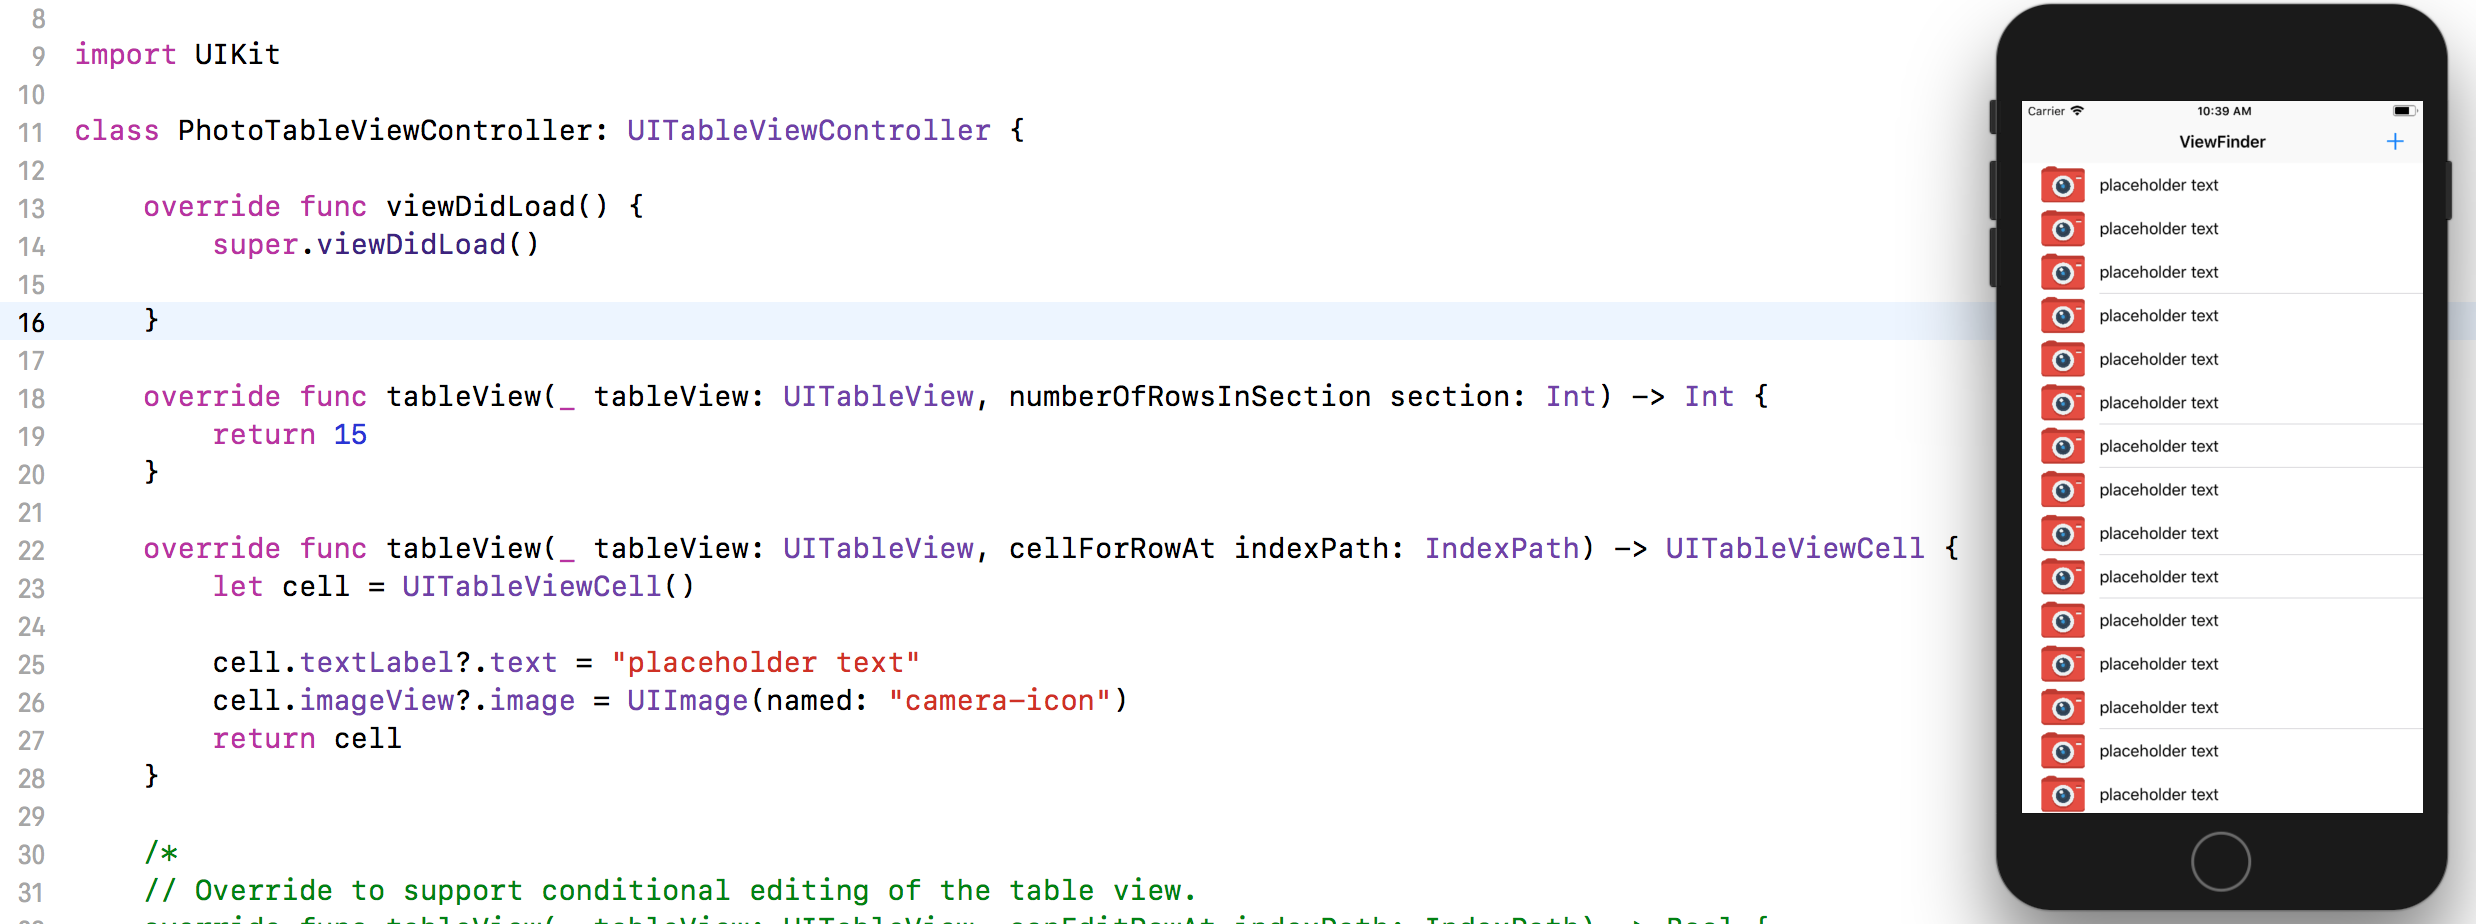
Your code should look something like this (left), and your app should look something like this (right):

Core Data:
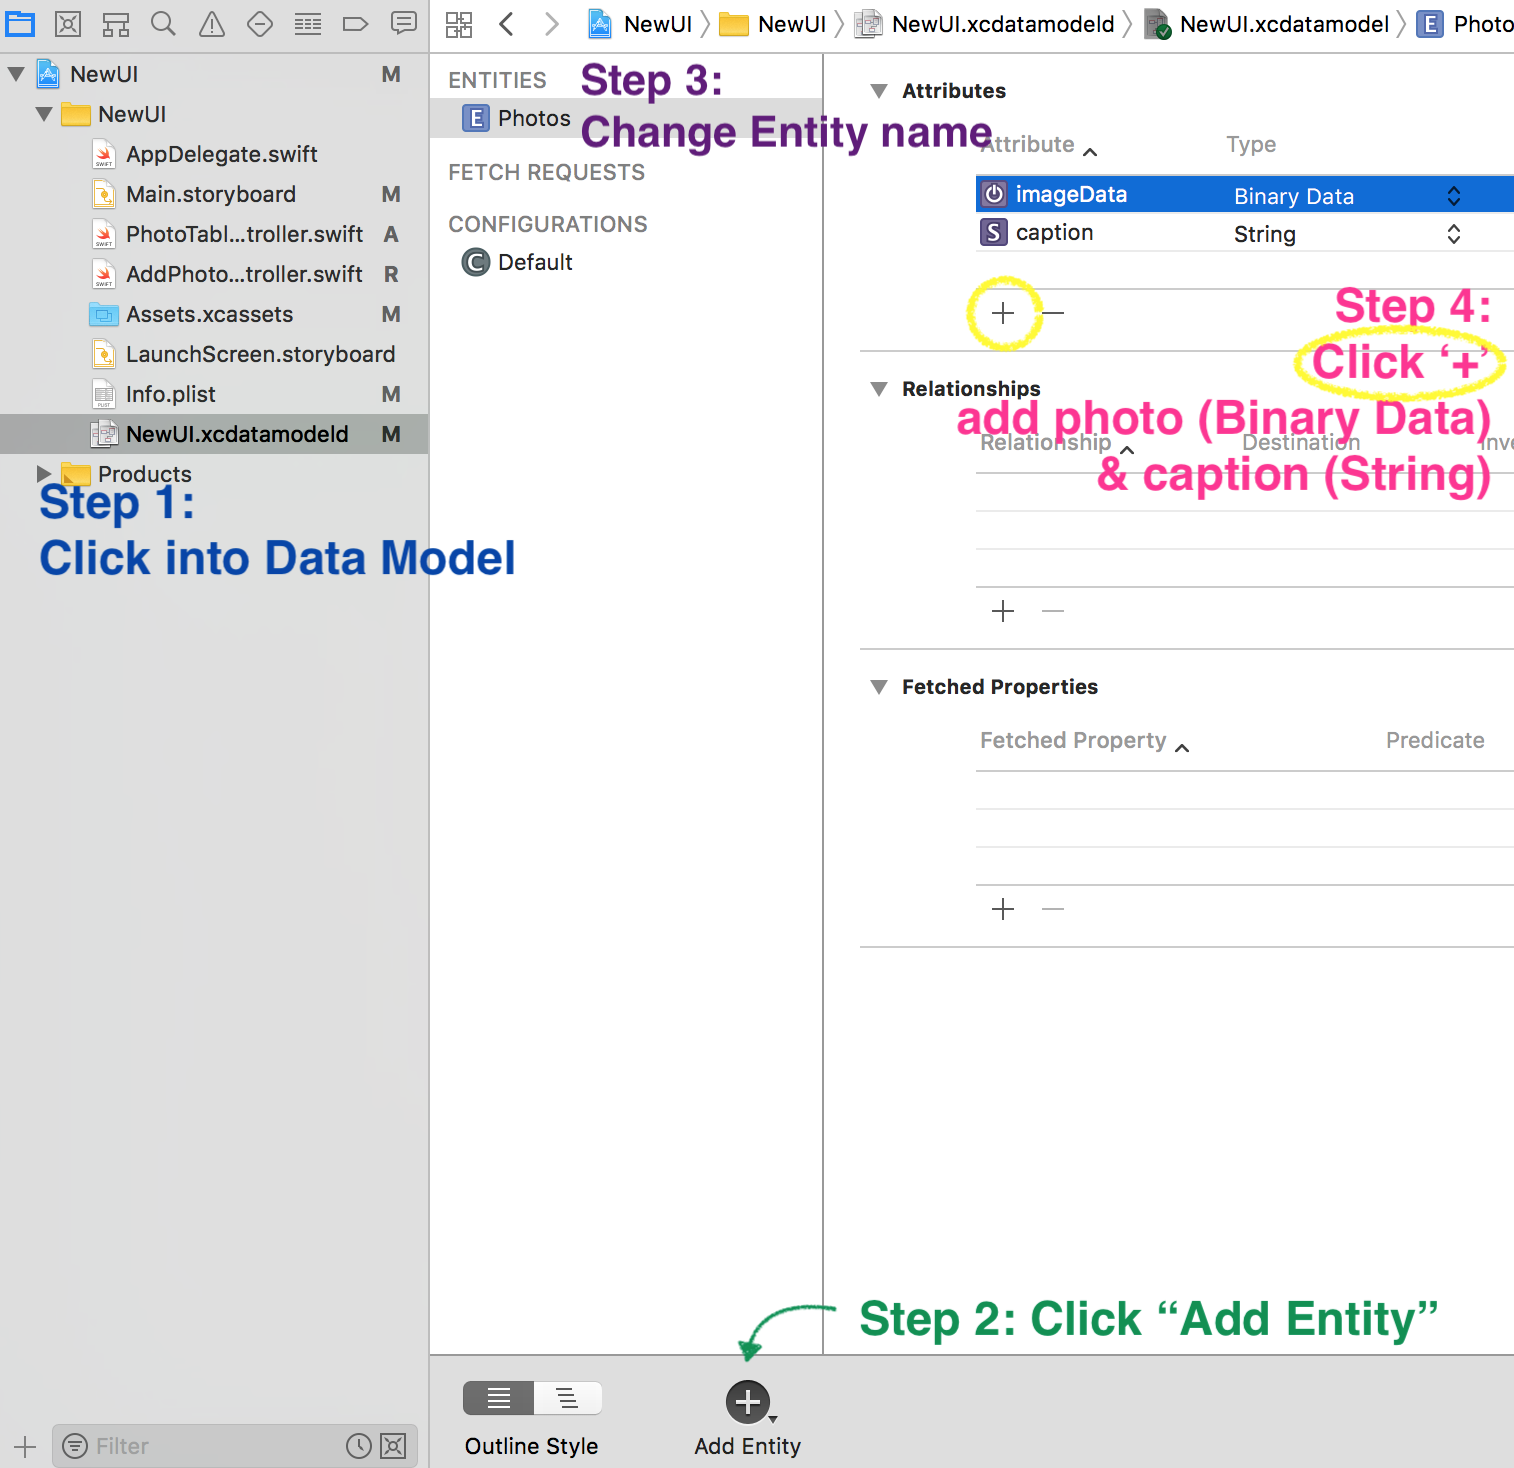
- Before we add any code, we need to create an Entity with Core Data. Follow the directions in the screenshot below.

- Create an action for your save/add
button, and an outlet for theTextField(the example called this outletcaptionText, for future reference). When this button is tapped, we will eventually need to do quite a few things:- get the Core Data context
- create an instance of the Core Data Object (I called my Photo; yours may be something else, so keep that in mind while you are going through this!)
- store the caption
- get the photo in a better format, then store it
- update all of this in Core Data
- use the navigationController to send out user back to the table view
-
Let’s start by making sure we can access the context (❗️do NOT just copy and paste this in; you have to create the action❗️)
@IBAction func savePhotoTapped(_ sender: UIButton) { if let context = (UIApplication.shared.delegate as? AppDelegate)?.persistentContainer.viewContext { } } - We now have access to the Core Data context, so we need to dig into that specific Entity we made earlier. (In the class example it was called
Photos. Again, if you are using your own naming which is TOTALLY ok, make sure you switch the right things out.) This line of code is saying: “I’m creating an instance of the Photos Entity from Core Data, a mini database. I’m telling it to use the Photos entity and that I want the context. I am storing all that information in a constant called photoToSave”.
This code won’t do anything yet; but it’s important in the setup!
if let context = (UIApplication.shared.delegate as? AppDelegate)?.persistentContainer.viewContext {

  let photoToSave = Photos(entity: Photos.entity(), insertInto: context)

}
- Looking back at our long to-do list, it’s time to store the caption! In this example,
captionTextis the outlet connected to the text field the user types into.
if let context = (UIApplication.shared.delegate as? AppDelegate)?.persistentContainer.viewContext {

  let photoToSave = Photos(entity: Photos.entity(), insertInto: context)

  photoToSave.caption = captionText.text

}
- Now it’s time to store the photo, which is unfortunately not as simple as the caption.
Look at the following:
newImageViewis the outlet connected to the placeholder icon that we want to update.- we are unwrapping it to make sure we have the image.
- on the next line, we are converting the
userImageinto a format that program can read. Once that’s done, we store thatuserImageDataas theimageDataproperty onphotoToSave
if let context = (UIApplication.shared.delegate as? AppDelegate)?.persistentContainer.viewContext {

  let photoToSave = Photos(entity: Photos.entity(), insertInto: context)
  photoToSave.caption = captionText.text

  if let userImage = newImageView.image {
    if let userImageData = userImage.pngData() {
      photoToSave.imageData = userImageData
    }
  }

}
- This has been a lot of work! Take a deep breathe. Only two steps left:
- update all of this in Core Data
- use the
navigationControllerto send out user back to the table view
- To update everything in Core Data, we will get the context, then call the
saveContext()function on it:
if let context = (UIApplication.shared.delegate as? AppDelegate)?.persistentContainer.viewContext {

  let photoToSave = Photos(entity: Photos.entity(), insertInto: context)

  photoToSave.caption = captionText.text

  if let userImage = newImageView.image {

      if let userImageData = UIImagePNGRepresentation(userImage) {
          photoToSave.imageData = userImageData
      }
  }
  (UIApplication.shared.delegate as? AppDelegate)?.saveContext()

}
- Lastly, we need to tell the
navigationControllerthat we want to send the user back to the other View Controller.
  if let context = (UIApplication.shared.delegate as? AppDelegate)?.persistentContainer.viewContext {

  let photoToSave = Photos(entity: Photos.entity(), insertInto: context)

  photoToSave.caption = captionText.text

  if let userImage = newImageView.image {

      if let userImageData = UIImagePNGRepresentation(userImage) {
          photoToSave.imageData = userImageData
      }
  }
  (UIApplication.shared.delegate as? AppDelegate)?.saveContext()

  navigationController?.popViewController(animated: true)

}
Check the simulator - what’s happening? What’s still missing, and why?
- At the top of your
PhotoTableViewControllerclass (it may has a slightly different name), let’s create an empty array, which will soon hold all our Core Data data. Call it whatever you would like/makes sense to you based on your Core Data Entity name. This example usedPhotosas the Core Data Entity name.
var photos : [Photos] = []
- We are saving the photos/captions, but we aren’t asking Core Data for them and we aren’t telling the Table View Controller to display them. In your
PhotoTableViewControllerclass, right below theviewDidLoad()function, write a new function:
func getPhotos() {

}
- Again, we need to get into the Core Data context:
func getPhotos() {

  if let context = (UIApplication.shared.delegate as? AppDelegate)?.persistentContainer.viewContext {
    // now we need to search through Core Data to find our photos/captions
  }

}
- Now that we have access to the context, we will use a function called
fetch()to retrieve data from Core Data. As you write your own code, remember, this example usedPhotosas the name of the entity in Core Data, andphotosis the variable that holds an array that was created at the top of the class.
function getPhotos() {

  if let context = (UIApplication.shared.delegate as? AppDelegate)?.persistentContainer.viewContext {

    if let coreDataPhotos = try? context.fetch(Photos.fetchRequest()) as? [Photos] {

      if let unwrappedPhotos = coreDataPhotos {
        photos = unwrappedPhotos
        tableView.reloadData()
      }

    }
  }

}
NOTE: If you are using Swift 5, you may not need to do that last unwrap, your code may look more like:
function getPhotos() {

  if let context = (UIApplication.shared.delegate as? AppDelegate)?.persistentContainer.viewContext {

    if let coreDataPhotos = try? context.fetch(Photos.fetchRequest()) as? [Photos] {
        photos = coreDataPhotos
        tableView.reloadData()
    }
  }

}
These libraries from Swift are very reliant on the version you are running on, so you may have slightly different code than someone sitting next to you. That’s ok. Follow the errors and work through it. You got this!
- This
getPhotos()function is all ready to go and will really help us out. BUT, we aren’t calling it anywhere. Let’s write a new functions,viewWillAppear(it should auto-populate as you start typing it), and inside of it, call thegetPhotos()function.
override func viewWillAppear(_ animated: Bool) {
  getPhotos()
}
We are getting so close! We just need to work on two functions. Take a little brain break if you need one!
- We need to update one of the
tableView()functions (the one withnumberOfRowsInSectionin the argument). Let’s change the return value to photos.count
override func tableView(_ tableView: UITableView, numberOfRowsInSection section: Int) -> Int {
     return photos.count
}
Run your simulator - what is different? What are we still missing? We should be seeing the right number of rows, but still seeing that placeholder image on the table. That’s because we still have that icon hard-coded in on this line:
cell.imageView?.image = UIImage(named: "camera-icon"). Let’s change that!
- We first need to access the current photo we are looking at.
let cellPhoto = photos[indexPath.row]

cell.textLabel?.text = cellPhoto.caption
- The function should end up like this:
override func tableView(_ tableView: UITableView, cellForRowAt indexPath: IndexPath) -> UITableViewCell {
    let cell = UITableViewCell()

    let cellPhoto = photos[indexPath.row]

    cell.textLabel?.text = cellPhoto.caption

    if let cellPhotoImageData = cellPhoto.imageData {
        if let cellPhotoImage = UIImage(data: cellPhotoImageData) {
            cell.imageView?.image = cellPhotoImage
        }
    }

    return cell
}
Run your simulator. You should now see your photos showing up on the list, and the list should only be as long as the number of photos you have!
❗️Commit Your Work ❗️
In your terminal, make sure you are still in the viewfinder directory. Add and commit your changes. Your commit message should be something like “Complete Iteration 2”.
Let’s keep going! Move on to Iteration 3