GitHub
BackGitHub is a cloud-based Git repository where developers can store and manage their code. Up until this point, we’ve been tracking changes on our local machines using Git. This is a great start, but what if you accidentally spill water all over your machine? All of that progress would be lost… unless you stored a copy of it somewhere else. That’s where GitHub can support our work!
Learning Goals
- Identify the key information on a GitHub repository
- Create repositories in GitHub
- Connect a local repository to a remote repository
- Push work from a local repository to a remote repository
- Fork and clone GitHub repositories
- Describe the difference between forking and cloning a repository
Vocabulary
- repository
- local
- remote
- push
- fork
- clone
Warm-Up
Before we dive into creating GitHub repositories, let’s take a moment to get comfortable looking at the key information provided to us on a GitHub repository. Open up this GitHub repository to identify some key pieces of information.
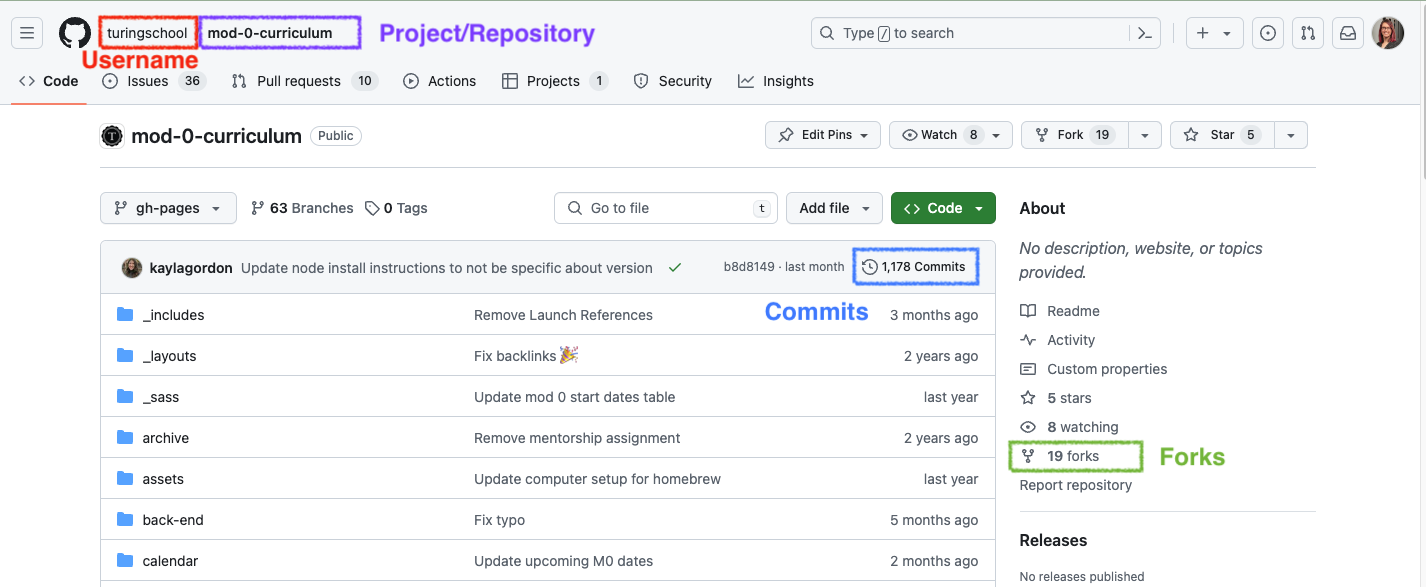
Key Information on a GitHub Repository
Visit this repository and answer the following:
- What is the name of this project/repository?
- Who is the user that created and owns this repository?
- How many commits are on this repo?
- When was the last commit made?
Connecting a Local and Remote Repository
There are many ways to create and connect local (on your machine) and remote (in the cloud) repositories. We can’t go through every combination of ways to do that, so we will focus on one. Once you are comfortable with this way, if you find another way to achieve the same outcome, you can absolutely use that.
- Create a directory called
github_practiceand add a file in that directory with the title of your program:ruby.mdorjavascript.md. - Initialize a Git repository in your
github_practicerepository. - Add your file and commit your work.
- Create a GitHub repository (do NOT check the box to create a README).
- Before completing the next steps, make sure that you have the
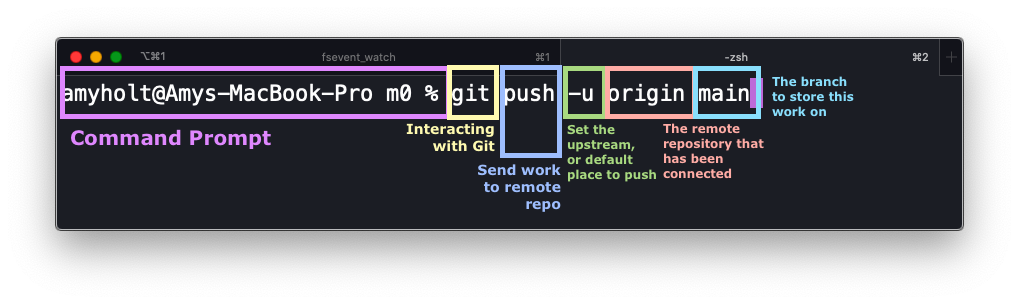
SSHbutton selected at the top. Then, follow the directions under...or push an existing repository from the command line, by running the following commands:git remote add origin git@github.com:USERNAME/REPO_NAME.gitThis command tells the local repository to set the remote repository to this address. We refer to it as theorigin.git branch -M mainYou do not need to do this if you have already configured Git to name the default branchmain.git push -u origin mainThis sends the current version of the project up to the remote repository, and sets themainbranch as the default branch to send work up to. Side note, the-uis optional.
- Refresh your GitHub browser tab. You should now see your repository!
What follows is a diagram that breaks down the anatomy of the git push -u origin main command:
Practice
Follow the steps listed above to connect a local Git repository with a GitHub repository.
Git & GitHub Workflow
Now that we have our local repository connected to a remote repository, we can see our files along with any commits that we’ve made on GitHub. This means we can continue to work on our local machine, adding and committing our work as necessary. Then, when we push to GitHub, a record of those new changes will also be added to our remote repository! After making 1 or more commits on a local repository, we can push our work up using the following command:
git push
Since we used the -u origin main in our original push to connect the two repos, we already established main as the upstream branch. For subsequent pushes, we can take out that part of the command and simply use git push. Note: If you did not use -u to set the upstream, you’ll simply type git push origin main every time.
After running this command, Git will send your work up to GitHub (you must be connected to the internet), and you’ll get many lines of output, finally telling you the work was successfully sent up. Refresh your GitHub browser tab, and the changes will be available there. Pushing work up to a repository is the act of using Git commands to send the most recent commits on a local repository up to the remote repository.
For the extent of our work with Git and GitHub workflows during Mod 0, you will primarily be pushing work up. It is definitely possible to also pull down changes from a remote repository to your local repository, but you will only need to do this if you make changes in the remote repository by mistake. Please remember to always make edits to files on your local machine and then push them up! This will avoid any merge conflicts.
Practice
In your previous repository, make two rounds of changes in the file you created, adding and committing those changes each time. When you're finished, push those changes to GitHub.
Note: All of these changes should be made in VS Code, not directly in GitHub!
A Common Issue
The most common issue on that first round of practice is that students connect to the remote repository using the HTTPS code instead of the SSH code. If this happens, when you attempt to push your work, your terminal will prompt you to enter your username and password every time. To avoid this annoyance, you can remove the remote connection and establish a new connection with the SSH.
- Check your current git remote origin connection using
git remote -v. - If you are connected to a remote origin that you do not have access to, remove your connection using
git remote remove origin. - Check that the git remote origin was removed using
git remote -v. If you don’t get anything in response, you know you aren’t connected to a remote repository! - Then you can create a new empty repository on your GitHub and connect it to that remote repository. Use the command
git remote add origin [insert SSH code here]to establish that connection. - Check your remote origin is correct now using
git remote -v. - Now that you’re connected to the correct remote repository, you can run those two commands to establish the main branch and push your work:
git branch -M mainandgit push -u origin main.
More Practice: Git & GitHub Workflow
Follow the steps below to practice connecting a local repository to a remote repository.
- Create a local repository.
- Create a GitHub repository.
- Connect the two repositories.
- Make a few changes and commits.
- Push up your changes.
- Make a few more changes and commits.
- Push up your new changes.
- View the commit history in the GitHub interface.
When this work time is over, be prepared to screen share to show your Terminal and/or GitHub and talk through your process, challenges, and questions you have.
Forking and Cloning Repositories
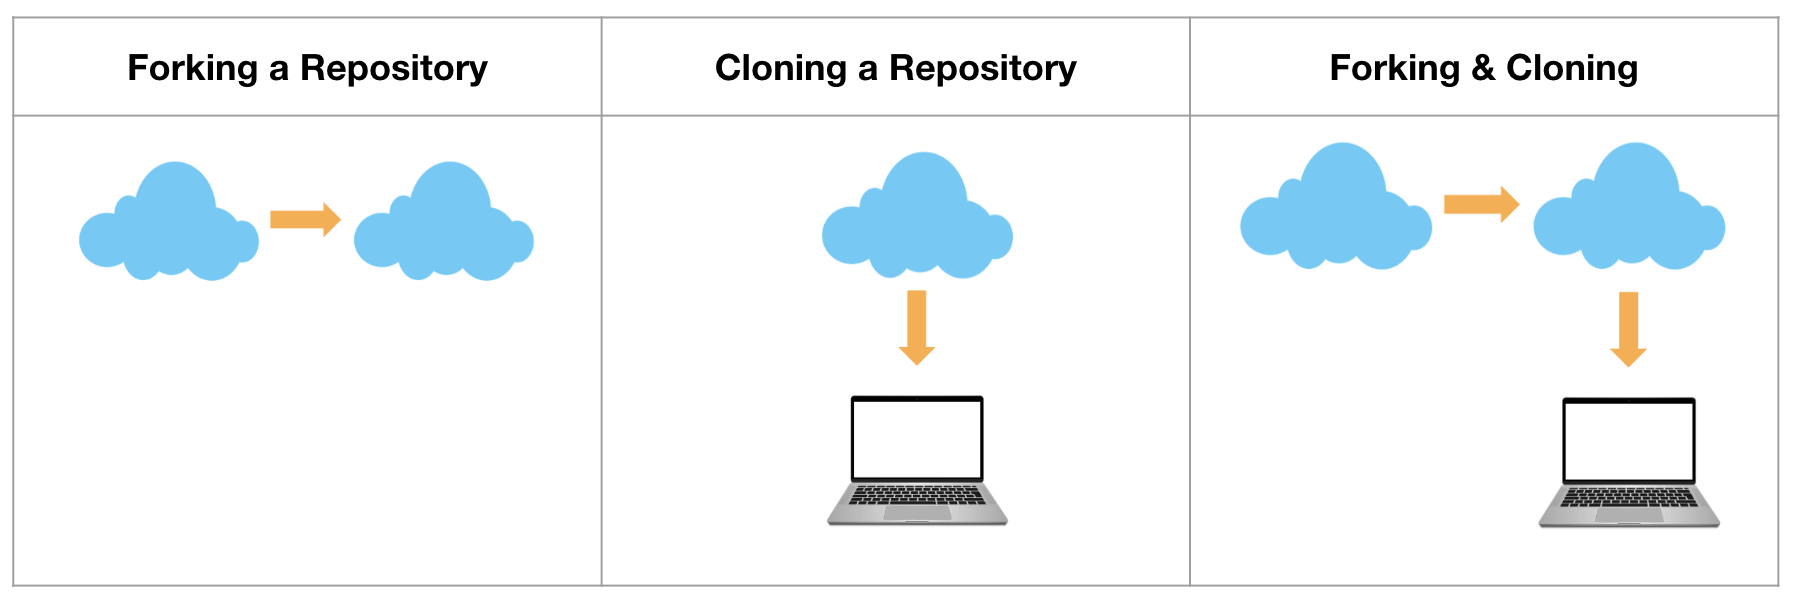
Often, you won’t be creating a project from scratch. What if you want to create a copy of an already-existing GitHub repository and work from that repository? We can fork a GitHub repository to make a copy of it on our own GitHub account. Or what if the company you’re working for already has an application and you need to make changes to it? We can clone a GitHub repository to our local machine, so that we can continue making changes from that already existing repository.
The diagram below visually shows the difference between forking and cloning a repository. In some cases, you may want to both fork and clone a repository. Forking allows you to create your own copy of a remote repository on your GitHub account and then cloning lets you edit and push changes up to your copy of the original repository.
To fork and clone a pre-existing GitHub repository, follow the steps below.
- Fork the repository. You will find the fork button in the top right corner.
- On your local machine, navigate to where you want to clone down the repo.
- Clone your copy of the repository to your local machine using the command
git clone [insert SSH code here]. - Move into that new directory and open the project in VS Code.
- Make some changes to the files by answering the questions in the
github_notes.mdfile. - Add and commit your changes. Note: This is not the “Initial commit” on this repo.
- Push your changes to GitHub using
git pushand refresh your browser to see those changes reflected in the remote repository.
Things to Note
A few things are a little different when you are cloning down a repository compared to creating your own repo from scratch.
- You don't need to create an empty directory on your local machine when you clone down a repository. When you clone, that directory is created for you.
- You also don't need to initialize git with
git initif you cloned down the repository. Git is already initialized in a repository that you clone to your local machine. - Your first commit message on the repo will not be
Initial commit. This is because the other commits on the repository are following the repo. If you run the commandgit log --onelinein that repository, you will see anInitial commitalready! Instead, use present imperative form to describe the change you made with that commit.
More Practice: Forking & Cloning
Work through this prompt independently.
- Fork this repository.
- In Terminal, navigate to where you want to clone down the repo.
- Clone your copy to your local machine.
- Make a few changes and commits.
- Push up your changes.
- Make a few more changes and commits.
- Push up your new changes.
- View the commit history in the GitHub interface.
Other Common Issues
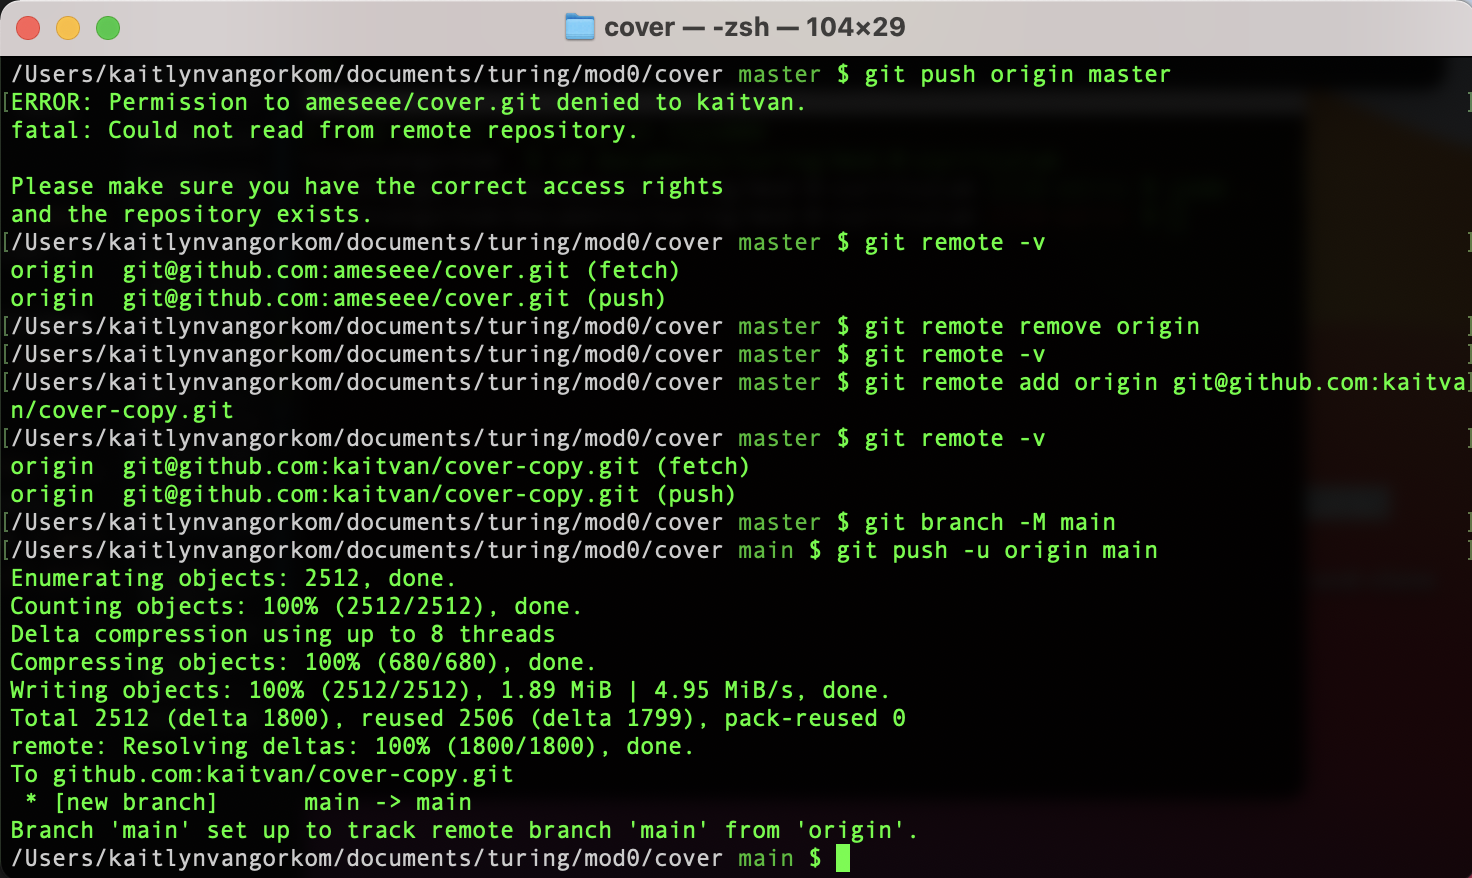
Occasionally, the command to push work up will result in a different error. When this happens, don’t panic. Carefully read the message and see if you can figure out what the problem might be. Take a look at this message below and make a guess about what the problem might be.
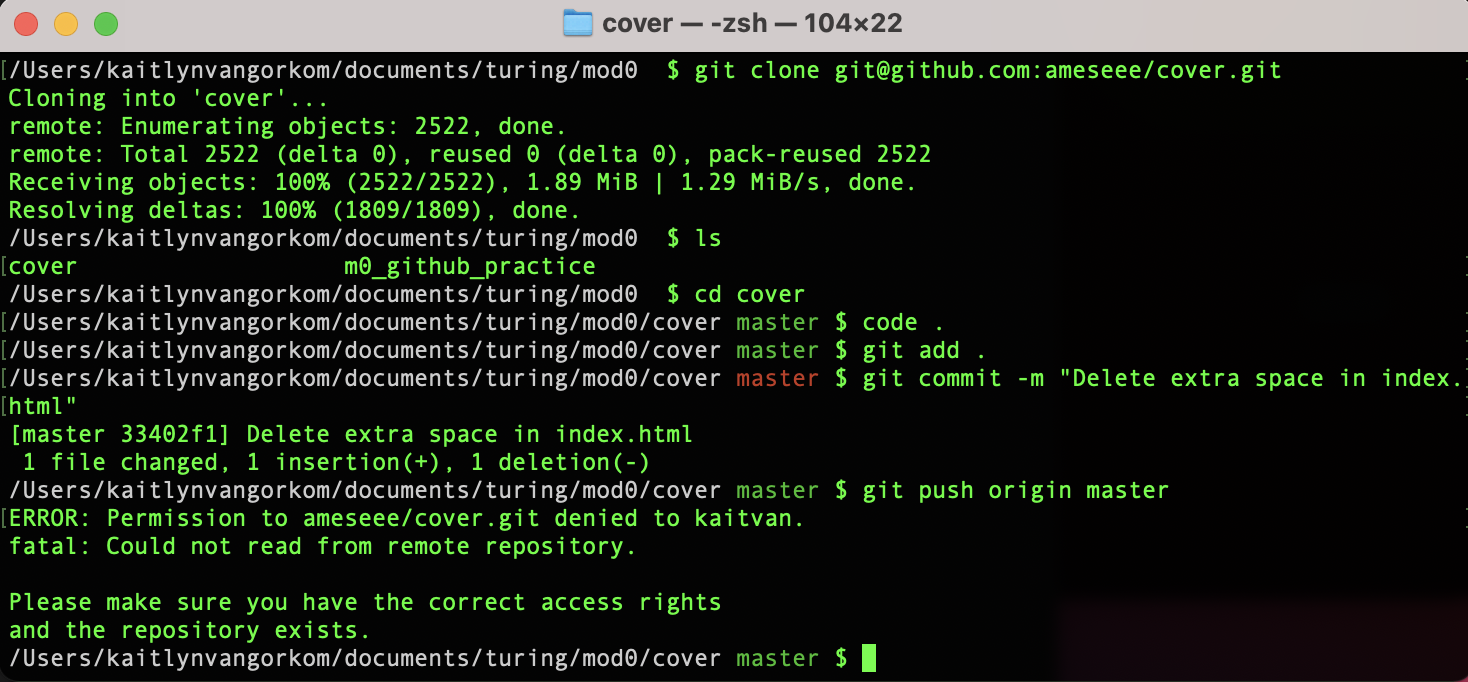
The error message describes the issue clearly. This user does not have access to this GitHub repository. This can happen if you forget to fork a repository before cloning it to your local machine. The good news is that you can remove a connection and reconnect to another remote repository on your account!
You can use the same process described earlier in the lesson to remove the remote connection and connect to a new remote repo instead. You can see an example of what that process might look like below.
Other common issues we’ve seen with students include:
- Trying to
pushbefore adding and committing changes - Creating a git repo inside of another git repo
- Initializing git in your home directory instead of the specific directory where you want to track changes
All of these issues can be corrected. The important thing is to reach out for help sooner rather than later.
Quick Tip
To see if you initialized git in a repository, use ls -a to show hidden files. If you see a hidden .git directory, that means that you have initialized git in that directory. If you don't want to have git tracking in that repository, you can remove it with rm -rf .git.
More Practice
Follow the steps below to demonstrate your understanding of the Git & GitHub workflow.
- Use keyboard shortcuts to move this browser window to the left side of your screen and your terminal in the top right corner.
- Fork this repository.
- Clone your copy of the repository to your local machine and move into that new directory.
- Open the repository in VS Code. Use a keyboard shortcut to move VS Code to the bottom right corner of your screen.
- Create a new file in that directory called
github_cfu.md. Add a list of a few git commands you know in that file. - Add and commit your work, and then push those changes to GitHub.
- Now, show how you would remove the remote origin. Hint: Do a quick search of this lesson using
cmd+ffor the keywordremoveto quickly find some guidance. - Create a new remote repository in GitHub and connect your existing local repository to that one. Hint: All of this can be done in GitHub and the terminal. You do not need to create a new local repository.
If you have any questions about GitHub as you’re working through this challenge, drop them in Slack along with any relevant screenshots!
Check For Understanding
In your Mod 0 Gist, create a section called Github and answer the following questions:
- How confident do you feel in your understanding and fluency with Github?
- What do you still need to practice or learn? How will you do that?
- What part of Github is still confusing for you?