Iteration 1: Dynamic To-Dos
Iteration 1: Dynamic To-Dos
🎯 Learning Goals
- Add functionality so user can add To-Dos to list, and see list updated
- Build a To-Do detail page, where user will eventually be able to delete a To-Do
Getting Started
- Make sure you’ve completed Iteration 0: Static To-Dos before starting this.
Design the AddToDoViewController
Now we’re going to build our AddToDoViewController! Let’s first create it visually, then we’ll add some code to go with it.
- Drag a new
View Controllerfrom the Object Library to the Storyboard - Create a segue from the add button (+) on our
Table View Controllerto our newView Controller(Action Segue ➡ Show) - this is going to allow us to move back and forth between views
Let’s think about what objects we will need to add to this view. Looking back at the finished app at the top of the page, we need…
- a label for
Title: - a text field where the user can add a ToDo
- another label for
Important: - a switch to toggle important/not important
- a button to add a ToDo
Don’t forget to add constraints so that it looks good on all screens!!!
Ideally, we probably would like our switch to be in the off position when we come to the page. If we highlight the switch in our storyboard and open the Attributes Inspector, we can change the state of the switch to off.
Now is probably a good time to run this in your simulator and make sure everything looks how you want it to.
- Now let’s add the code file that will be associated with this
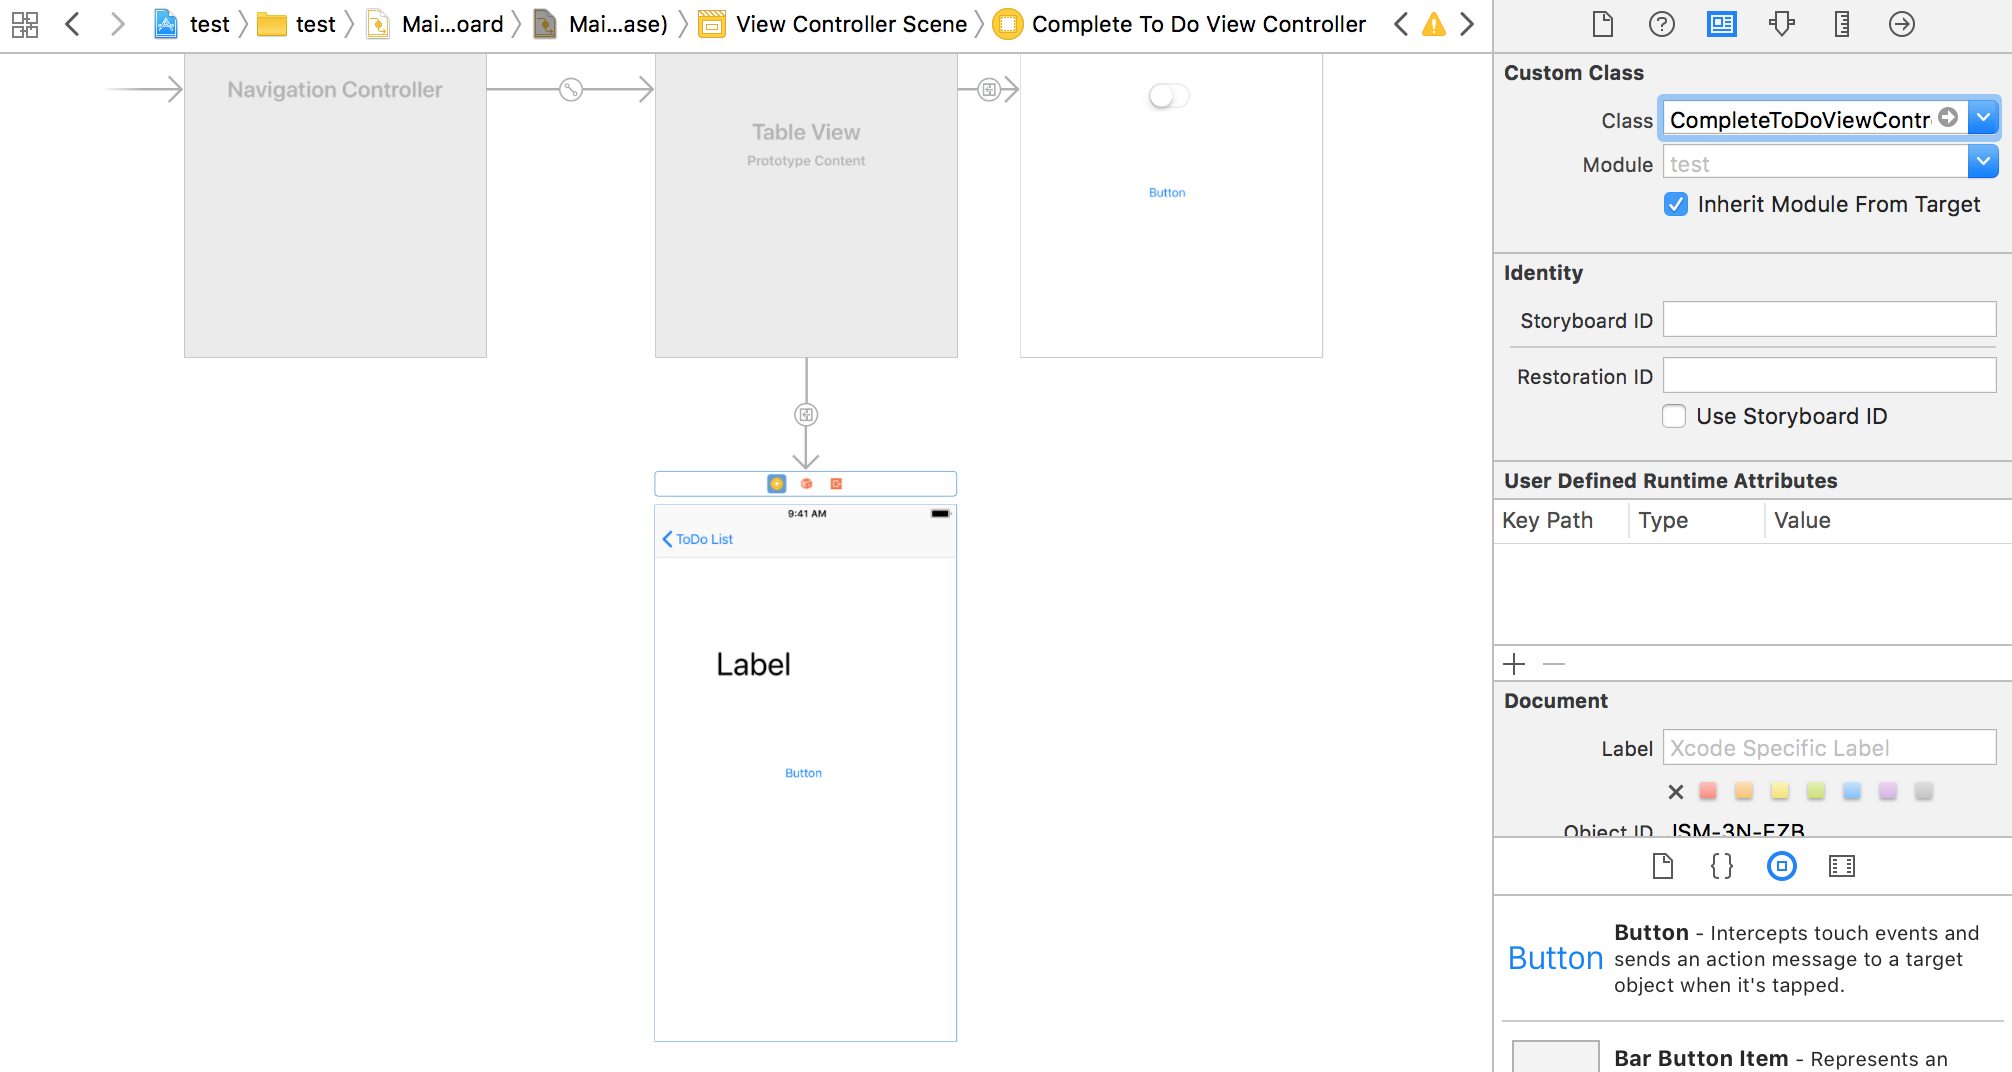
View Controller(File ➡ New ➡ File… ➡ Cocoa Touch Class ➡ Next) - this will be a subclass ofUIViewController(I called mine AddToDoViewController) - In your storyboard, select this
View Controllerand then open the Identity Inspector and add the new class you just created to connect the code to the View Controller - Next, let’s just make the necessary outlet and action connections we need:
import UIKit

class AddToDoViewController: UIViewController {

  @IBOutlet weak var titleTextField: UITextField!
  @IBOutlet weak var importantSwitch: UISwitch!

  override func viewDidLoad() {
    super.viewDidLoad()

  }

  @IBAction func addTapped(_ sender: Any) {
  }

}
Adding ToDos
Now we want to work on adding a new ToDo from the AddToDoViewController, then popping back to the ToDoTableViewController and being able to see that new ToDo in our Table View
- First, we need to make a new ToDo item inside our
addTappedfunction and grab the value of the input field as well as the importance status of the ToDo:
@IBAction func addTapped(_ sender: Any) {
  let toDo = ToDo()

  if let titleText = titleTextField.text {
    toDo.name = titleText
    toDo.important = importantSwitch.isOn
  }
}
Now we need to add this ToDo to our ToDo array. We have a small problem though… that ToDo array lives on another class (ToDoTableViewController). No worries! We can fix this by adding a reference to that class in our AddToDoViewController. All we need to do is add the following line of code above our Outlets.
var previousVC = ToDoTableViewController()
Now in the ToDoTableViewController, we need create a prepare for segue function (this gets called right before a segue happens)
- Un-comment out the
preparefunction at the bottom ofToDoTableVeiwController.swiftand add the following code to create a reference to theAddToDoViewController
override func prepare(for segue: UIStoryboardSegue, sender: Any?) {
  if let addVC = segue.destination as? AddToDoViewController {
    addVC.previousVC = self
  }
}
Now back in the AddToDoViewController, we can access the ToDo array that lives in the ToDoTableViewController.
- Add the new ToDo to the array and update/reload the Table View:
@IBAction func addTapped(_ sender: Any) {
  let toDo = ToDo()

  if let titleText = titleTextField.text {
    toDo.name = titleText
    toDo.important = importantSwitch.isOn
  }
  previousVC.toDos.append(toDo)
  previousVC.tableView.reloadData()
}
If we run our application right now, we can add a new ToDo, click
< ToDo List, and our new ToDo is there in our Table View!!!
Only thing left to do now for this part is have it automatically pop back to the Table View when the user taps Add. We just need to call a single function after we update/reload the Table View.
- Pop back to the previous view when the user taps the
Addbutton
@IBAction func addTapped(_ sender: Any) {
  let toDo = ToDo()

  if let titleText = titleTextField.text {
    toDo.name = titleText
    toDo.important = importantSwitch.isOn
  }
  previousVC.toDos.append(toDo)
  previousVC.tableView.reloadData()
  navigationController?.popViewController(animated: true)
}
Run your application in the simulator to make sure everything is working correctly.
Completing/Removing a ToDo
Now we want to focus on being able to select a ToDo from the Table View and being taken to another view where we can mark a ToDo complete and remove it from our list.
- Add another
View Controllerto your Storyboard (I added mine below theToDoTableViewControllersince it will segue from there) - Select the
ToDoTableViewControllerand create a segue from ToDo List (top, left icon in Table VC) to the new View Controller (Manual Segue ➡ Show) - this automatically gives us a nav item that can take us back to the ToDo List - Add a label for our ToDo and a complete button to the Storyboard
- Create a code version of this View Controller (File ➡ New ➡ File… ➡ Cocoa Touch Class ➡ Next) - make this a subclass of
UIViewController - Go back to the Storyboard, select the view that you just created and connect it with the code file you just created

- Create the necessary outlet and action in the code file:
import UIKit

class CompleteToDoViewController: UIViewController {

  @IBOutlet weak var titleLabel: UILabel!

  override func viewDidLoad() {
    super.viewDidLoad()

  }

  @IBAction func completeTapped(_ sender: Any) {
  }
}
When the user taps on a single ToDo, we want to initiate the segue from the ToDo List to the CompleteToDoViewController. In order for that to happen, we have to give the segue a name.
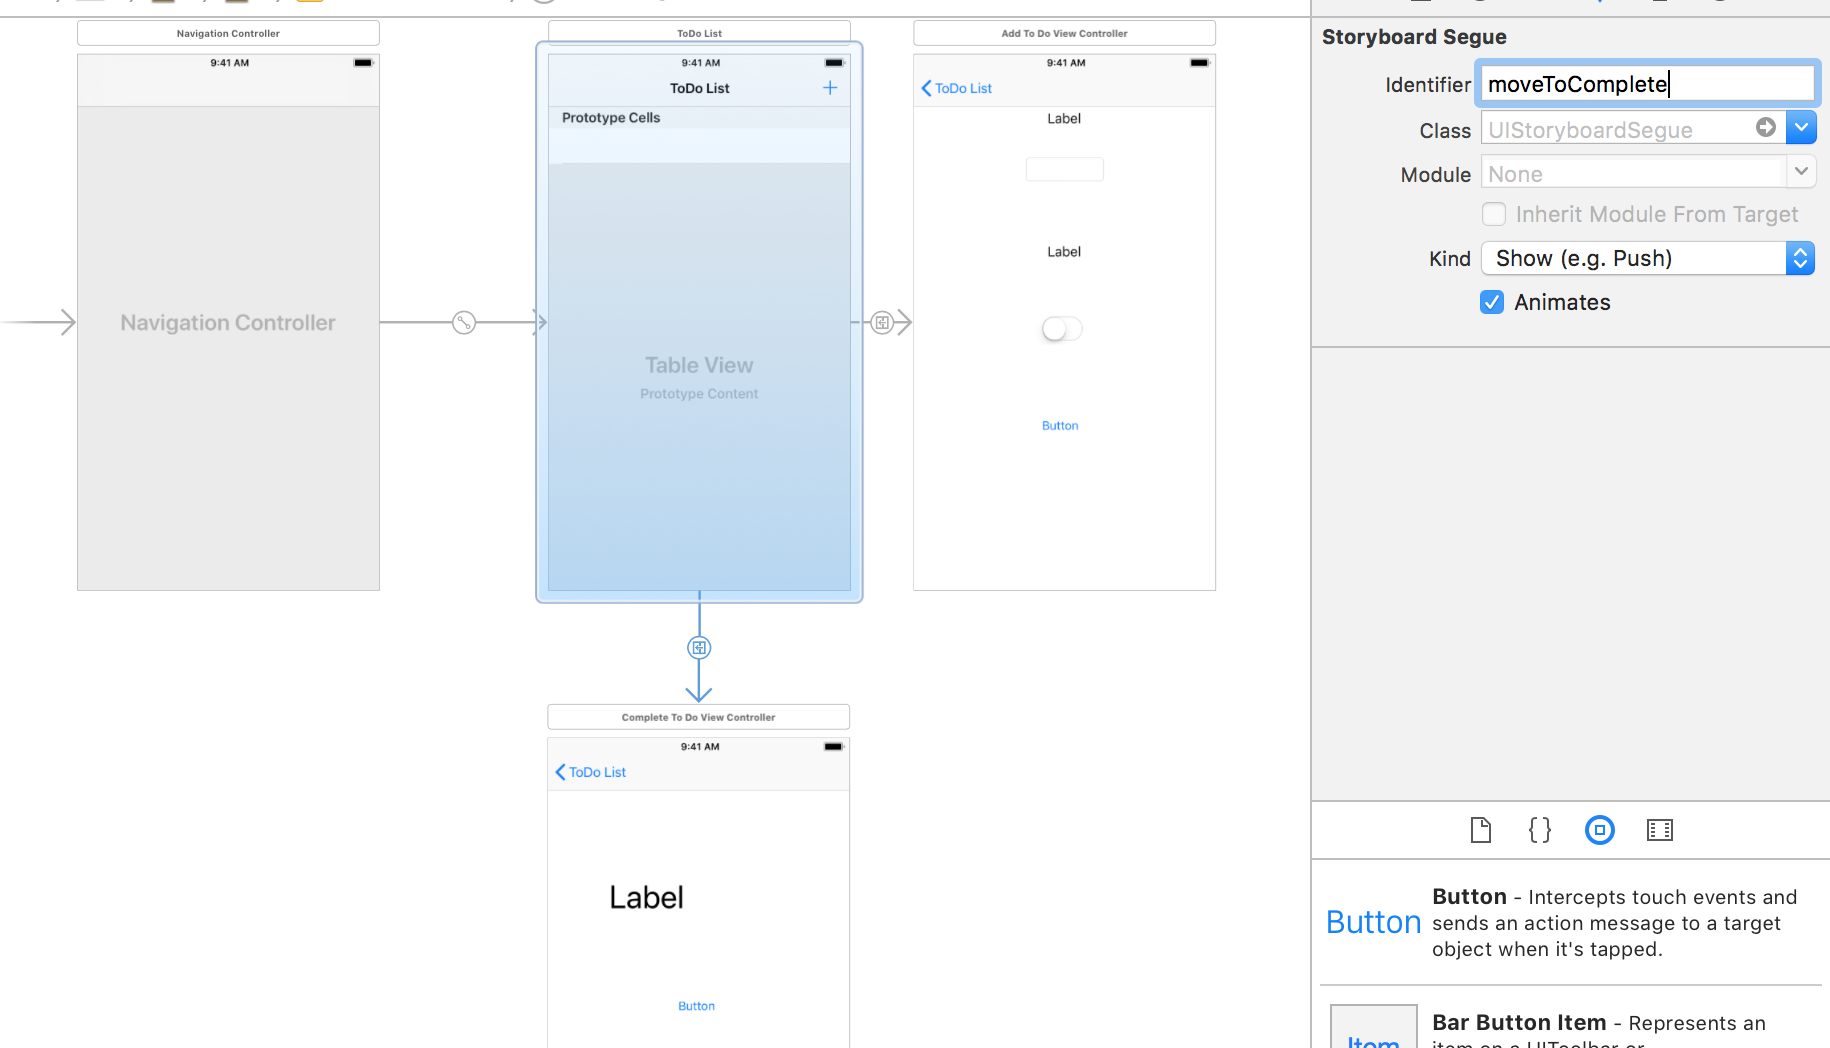
- Highlight the segue between the
ToDoTableViewControllerand theCompleteToDoViewControlleron the Storyboard and open the Attributes Inspector. Let’s give this segue a name ofmoveToCompletein theIdentifierfield

Now we need to go back to the ToDoTableViewController and add a tableView function that has an argument of didSelectRowAt. Inside of here, we want to call performSegue (you should be able to press Enter to autocomplete this function with the correct arguments). Here is where we are going to give it that identifier of moveToComplete (this needs to be a string). We also need to grab the single row/ToDo to pass to the sender.
override func tableView(_ tableView: UITableView, didSelectRowAt indexPath: IndexPath) {

  // this gives us a single ToDo
  let toDo = toDos[indexPath.row]

  performSegue(withIdentifier: "moveToComplete", sender: toDo)
}
We should now be able to make the segue, but our ToDo doesn’t show up. Let’s fix that!! First, we need to add two properties on our CompleteToDoViewController class so that we can reference the (previous) ToDoTableViewController.
var previousVC = ToDoTableViewController()
var selectedToDo = ToDo()
We need to revisit our prepare for segue function that we wrote in our ToDoTableViewController. This function gets called whether we segue to the AddToDoViewController or segue to the CompleteToDoViewController, so we need to be a little more specific.
override func prepare(for segue: UIStoryboardSegue, sender: Any?) {
  if let addVC = segue.destination as? AddToDoViewController {
    addVC.previousVC = self
  }

  if let completeVC = segue.destination as? CompleteToDoViewController {
    if let toDo = sender as? ToDo {
      completeVC.selectedToDo = toDo
      completeVC.previousVC = self
    }
  }
}
We’ve now successfully set up the segue and we need to make sure that the ToDo text is getting to the CompleteToDoViewController.
- In
CompleteToDoViewController.swift, we need to add some code to ourviewDidLoadfunction to grab the name of the ToDo and assign it to the text of ourtitleLabel
override func viewDidLoad() {
  super.viewDidLoad()

  titleLabel.text = selectedToDo.name
}
Run your application on the simulator and make sure you are getting the ToDo in the CompleteToDoViewController. Everything should be working great now!
The only piece of functionality that we are missing is being able to remove a ToDo from the ToDo List (Table View). Since we are just working with hard-coded data at the moment, we would have to loop through the array and find the ToDo that we are wanting to remove. This is kind of a pain and won’t be necessary once we implement CoreData, so hang tight for a bit and we will add this functionality once we are dealing with real data in our mini-database!
Commit Your Work
In your terminal, make sure you are still in the viewfinder directory. Add and commit your changes. Your commit message should be something like “Complete Iteration 1”.
Let’s keep going! Move on to Iteration 2